Scuba Diving Equipment List and Uses

Are you getting into scuba diving and not sure what is needed to scuba dive? Or maybe you are ready to purchase your own equipment and need a comprehensive checklist. Well, here is our scuba diving equipment list and the uses for each item!

Scuba Diving Equipment Gear Checklist
Our Scuba Diving Equipment Gear Checklist. See below for a comprehensive guide on each item.

Scuba Diving Equipment List and Description

Mask & Snorkel

You can open your eyes underwater but your vision will be blurry so this is why you will need a diving mask. The diving mask should have tempered glass. A snorkel is used on the surface for long surface swims to conserve air, or if the surface is choppy.

Regulator

A regulator will consist of 4 main hoses.
1. A Primary Air Source that the diver will breathe from.
2. A Secondary Air Source (also known as an Alternate, or an Octopus) for your buddy if they run out of air.
3. A Submersible Pressure Gauge (SPG) so you know how much air is in your tank.
4. A Low-Pressure Inflator (LPI) that will connect your tank to your BCD so you can inflate the jacket.

Air Tank/Cylinder

Air tanks can come in various sizes. This will hold your air or the gas you will breathe fr

BCD

A Buoyancy Control Device or Buoyancy Compensator is an inflatable bladder that the dive will wear. It is typically a jacket or a wing-style. The bladder controls a diver’s buoyancy, and helps you go up and down underwater, and will keep you buoyant for safety while on the surface.

Fins

Fins (not flippers!) are worn on your feet to help you move more efficiently underwater. They extend your leg so you get more power when you kick your legs. There are many styles and designs of fins. You can also choose from open or closed-heeled fins, and wear fins with or without dive boots.

Weights / Weight-belt

Weights will help you descend in the water. They can be worn on a weight-belt, or as integrated weights in your BCD pockets. The number of weights will depend on several factors, and you should be properly weighted to make scuba diving more comfortable.

Dive Computer

A dive computer will tell you important information that you need while scuba diving. At a minimum, it will give you the depth, the time elapsed during your dive, and your No-Decompression Limit (NDL). Take a look at the difference between a dive watch and other features of a dive computer.

Looking for the smallest dive computer for everyday use? Check out my comparison guide!

A Suunto Dive Computer
Dive computers will tell you the depth, time, and your NDLs.

Exposure Protection

There are several types of exposure protection that you can wear as a scuba diver. Drysuits are used in cold water diving. Wetsuits come in various thicknesses depending on the water temperatures, and rash-guards are comfortable for warm water diving.

Hood, Gloves, Booties

These items are additional exposure protection that may be used in cold water diving, or in more extreme diving conditions such as in caves or wrecks.
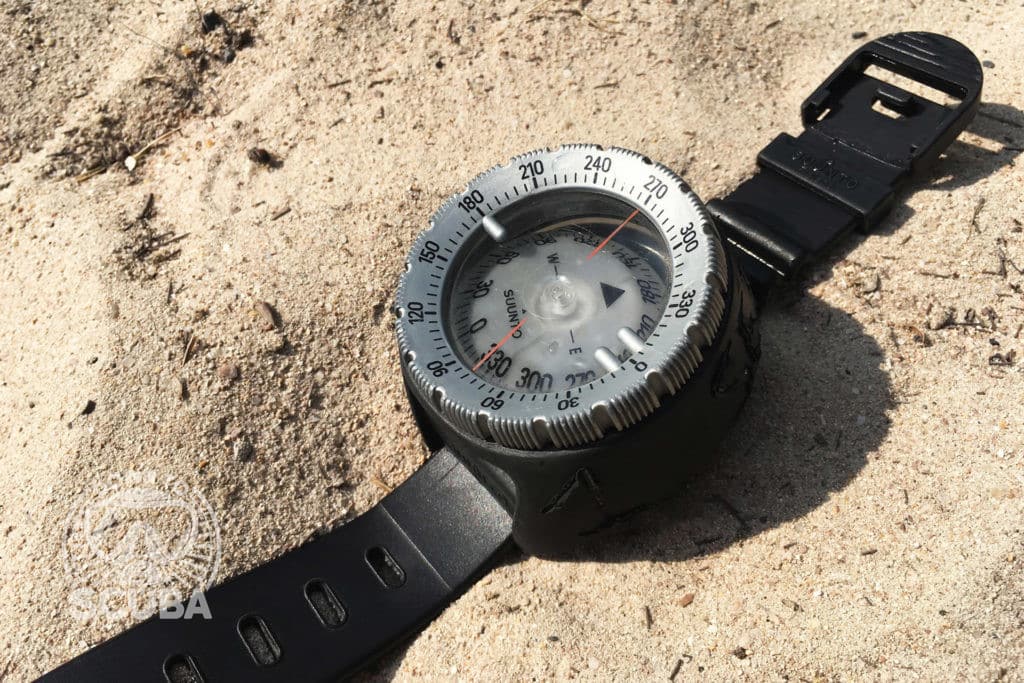
Dive Compass

A compass will tell you the direction of magnetic North. This is important when learning how to navigate a new dive site, and how to return back to a dive boat. Navigating with a compass underwater is a great skill for any diver; beginner or experienced.

How To Navigate with a Compass Underwater when you are scuba diving. A photo of a standard diving compass.
A compass assists scuba divers with underwater navigation.

Dive Light Torch

A dive torch will brighten things up underwater. The light allows colors to pop out as we lose color quickly in the water. It is also made specifically for underwater use. Firstly, it is waterproof Secondly, it is very strong which causes it to heat up. This is why you should only use dive torches/lights underwater, and not on-land as they may overheat

Dive Knife / Cutting Tool

A dive knife or cutting tool is a standard piece of equipment for divers. This is placed in a pocket, or somewhere that is easily accessible by both hands (sometimes it it strapped onto your leg). It is especially useful for removing fishnets or lines that may cause entanglement to the diver.

Surface Marker Buoy or Dive Flag

This is a visible marker that floats on the surface while a diver is under the water. A delayed surface marker buoy (dSMB) is inflated and deployed near the end of the dive, during a safety stop before the diver comes up from the dive. While a dive flag will remain on the surface during the whole dive. Buoys and flags warn boat traffic and people above that there is a diver below and to exercise caution when moving on the surface.

Whistle / Noise-Maker

Another safety piece of any scuba diving kit is some sort of noise-maker, such as a whistle or a shaker. This is used to alert boats on the surface, or other people underwater, in the event of an emergency or a separation. Losing a dive on the surface is rare, but it can happen.

Scuba Diving Equipment Prices

Scuba diving equipment is not cheap, and it shouldn’t be. These specialized equipment has been tried and tested under extreme pressure and heavy use. This means it is safe for us to scuba dive with and we can rely on it. Scuba diving equipment prices will range however.

This will be due to brand names, how extreme the conditions will be where you will be using it (tropical vs. cold water diving), additional features of the item, whether it is colorful or has patterns, if it is light-weight and the material it is made from, what pressure it is to be used for, and more.

Be prepared to pay hundreds of dollars for high-quality scuba diving equipment. However, there is always second-hand dive equipment available. Just make sure you get everything checked and serviced by a certified technician before spending the money!

All You Need for Scuba Diving

So there you have it, a scuba diving equipment list and its uses for anyone who is planning on going scuba diving. Most dive centres will have all of this equipment for rental use, or if you plan on purchasing your own kit, use this list as a reference. Enjoy!

How To Navigate with a Compass Underwater

Navigation using maps, even GPS systems, especially in a car has to be among the number one causes for couples arguing. The word compass alone can send shivers down ones’ spine. Now, let’s take all that and recreate a navigation scenario underwater on your third-ever dive in the ocean. Furthermore, your partner is your buddy. Nothing can go wrong, right? So let’s take a look at some tips on how to navigate with a compass underwater which should help alleviate some of the anxiety!

How To Navigate with a Compass Underwater

Truth be told, underwater navigation using a compass is not all that different from compass navigation on land. The primary differences are the addition of vertical space and movement, additional gauge monitoring introducing time pressure, limited visibility, and currents. Using natural navigation scuba diving can also greatly improve your navigating success. Spacial awareness and correct compass positioning are both essential in achieving your goals in underwater navigation.

We will have a look at how we can deal with these additional challenges that arise during underwater navigation. But first, let’s go over the very basics.

How to use a Compass

A compass is similar to a personal computer because it does not interpret what you want and tell you an answer. You need to tell it what you want it to do.

Similarly, a compass does not interpret your navigation needs or tell you where to go. It simply helps you orientate yourself in relation to the magnetic north, which then helps you navigate.

And yes, on a standard underwater compass, the magnetic north needle always points north.

A compass is designed to aid in navigation and has, therefore, the main four cardinal directions painted on it. These are separated by a 90-degree angle.

These are North (N), East (E), South (S), and West (W).

National Geographic has a great little exercise to familiarise yourself with cardinal directions. Practicing on land really helps when learning how to navigate with a compass underwater.

A compass is an essential piece of a Rescue Diver’s Equipment list.

Interpreting this Information

Now, as navigators, we interpret the direction we want to travel in based on our starting point and the cardinal directions. The direction we are facing when looking down at our compass is our travel direction.

Navigation on its most basic level is a vector, or straight line, between point A and point B. The direction of that travel path can be determined by standing on point A and rotating to face point B and reading your compass heading.

Divers avoid complex travel paths underwater and often employ the compass reciprocal heading, keeping it really simple.

This allows divers to go from point A to point B and then back to point A, their starting point, easily. Reciprocal is just a fancy word for going and coming back in equal direction and distance. It is mathematically a 180-degree turn at point B reciprocating the starting travel direction in order to end up at the starting point.

So remember that you are less likely to get lost traveling slowly over a short distance. Furthermore, it is ok to get lost. No need to panic, as we can ascend if we need to. If we employed the former rule we should not be too far from our starting point.

You will learn how to do this in your first level certifications courses with PADI, SSI or RAID.

The Compass Lubber Line

The compass lubber line is usually a red line painted on the face of the compass. This line helps the navigator visualise the directional travel path from their starting point to their desired travel destination. If we wanted to travel not exactly in one of the main four cardinal directions, we can use the lubber line to aid in establishing direction.

Here is an image of three different travel directions and what they look like on our compass.

Compass Lubber Line Travel Direction Example

From left to right, we are traveling North-West, South-West and finally directly West.

Notice how this compass has a lubber line that is about 21 degrees off centre where the wrist straps are?

Offset Compass Lubber Line

This means we do not need to hold it as rigidly at a 90-degree angle. It allows for a more casual glance for more advanced navigators.

As long as we imagine our travel direction along the lubber line (red line) we are traveling in that direction.

Underwater Navigation Challenges

Still, this all sounds a bit technical and complicated. So let’s dive into the added challenges when navigating underwater.

Three dimensional movement

I can also go up and down in the water. This is a common mistake new divers make. The added task of navigation causes them to perceptually narrow on their compass. Meaning the diver will often forget to check their depth, check their air, or even on their buddy.

Maintaining a buddy system is part of safe diving practice. See what else divers can do for their own safety.

In order to avoid ascending or descending while maintaining a travel direction underwater, divers wear their compass and computer on their right wrist and grab their left elbow with their right hand.

Here is what that looks like:

Correct Compass Position when Navigating Underwater

This creates a sort of ‘cockpit’ where they can easily see their dive computer as well as their travel direction indicated by the lubber line. This position also means that they are swimming in the direction of the lubber line as this keeps the lubber line parallel to their bodies.

Holding a compass too casually and not imagining the travel direction line means you will not end up at the desired destination.

Like in this picture below:

Wrong Compass Position

If we use the lubber line to travel North-East in the above situation, we would not end up traveling in the direction of the red line. The green line is the direction we are actually traveling in, which would be directly North.

Monitoring Air and NDL as well as Depth

Underwater divers need to continually monitor their no-decompression limits, remaining air supply, as well as their depth. They also need to maintain a buddy system. Because there is limited time at depth, we cannot park the car on the side of the road and rotate our huge paper map several times around until we realize we didn’t need to rotate it in the first place.

This often causes new divers to commit to a travel direction and stick with it without making sure they are maintaining it and are actually swimming in the right direction.

Limited Visibility and the lack of Peripheral References

On land, once you have established your travel direction and you see a prominent mountain in the distance, you have this peripheral reference to aid you in navigation, even over long distances.

Underwater, visibility is sometimes limited to 10-15 meters and at times much worse at almost zero visibility. This forces divers to focus on and trust their compass direction more. We still use natural navigation scuba diving but in a different fashion.

For example, once I have established my travel direction and I see a distinct coral in that direction, I can then use this coral as a natural reference. Once I reach it, I can find a new natural reference in my travel direction. This will also aid me when returning on my reciprocal heading as I should recognize some of these visual references on my return journey.

Underwater Currents

If you are doing everything correctly but you are swimming perpendicular to a current, it will push you off course. In order to not lose your desired travel direction, you can use natural and visual references. If you are near the bottom, watch for small shells, sea urchins, corals, etc, and imagine your travel direction in a line between these.

If you notice that they are moving left or right away from your imagined line, you know you need to compensate for the current.

My best navigation tip is to always validate where you are as opposed to getting lost and trying to re-establish direction underwater.

What does this mean?

Let’s say I descend on a mooring line, I always turn my body on the surface in my desired travel direction and descend that way.

At the bottom, I find a natural reference before I swim into the dive site and remember the depth. Then I take a heading using my compass and in a roving path follow this direction using natural references and validating my direction using the compass direction.

Once I want to turn around, I simply do a reciprocal heading and travel parallel to my first path to navigate back to the boat.

What about the fancy numbers on top?

These are your degree headings painted on the bezel of your compass. If you needed to travel exactly in a 112-degree heading for a long distance to find a small object, degree heading come in handy. However in scuba diving we almost never travel far or need to travel in very exact directions. We can divide the main four cardinal directions and that normally suffices with the aid of natural navigation.

Keep it simple when learning how to navigate with a compass underwater on your scuba diving adventures.

So, before you navigate yourself into the next argument with your better half underwater, remember these simple steps on how to navigate with a compass underwater.

Diving in Costa Rica, Catalina Islands

WHERE ARE WE GOING?

Today we are diving in Costa Rica! Heading to Catalina Islands, from the town of Tamarindo.

WHY ARE WE DIVING IN COSTA RICA AT THE CATALINAS?

The Catalinas is an archipelago of around 17 volcanic rock formations set 2-15 miles off the northwest Pacific coast of Costa Rica in the province of Guanacaste. It provides a rich ecosystem, perfect for snorkeling and diving in Costa Rica.

The marine life here is just amazing…. so, so rich! Among the species, you can find sea turtles, white-tipped reef sharks, moray eels, octopuses, sea stars, sea urchins, colored tropical fish, big schools of fish of all kinds, mobula rays, spotted eagle rays, families of whales and when we are lucky, whale sharks.

Read More: Everything You Need to Know About Spotted Eagle Rays!

Last year in August, giant manta rays visited the archipelago almost daily but they are usually spotted from December to March. The main attraction for diving in Costa Rica at the Catalinas is the big fish, especially sharks, manta rays, and whales!

Will you need a surfing or diving wetsuit when you get to Tamarindo?

A beautiful eagle ray about to glide off in Costa Rica
A Spotted Eagle Ray. Photo courtesy of Tamarindo Diving

HOW DO WE GET THERE?

To start diving in Costa Rica, you should first get to Tamarindo. This is the main surf town on Costa Rica’s Pacific coast. The best way is to fly into Liberia, the capital in the province of Guanacaste. Then it is a 50-minute drive from Liberia to Tamarindo.

You can also fly to San Jose which has more connections as it is the capital city of Costa Rica. From San Jose to Tamarindo, it is a 4-5 hours drive depending on traffic.

The bus company Alfaro connects San Jose to Tamarindo and vice versa, twice daily. The bus trip lasts approx. 6 hours. Shuttle service is also available from both airports.

CATALINA ISLAND DIVE SITES

The Catalina’s archipelago has many dive sites. Catalina Grande (the main islet) has 4 diving sites: Clasico, La Paila, Shallow, and Punta Norte.

Other diving sites in the same archipelago are Roca Sucia, Cuatro Piedras, Sombrero, Roca Escondida, Elefante, and many more.

The depth of all sites varies from 12 to 30 meters. Marine life is very similar in all these diving sites. As mentioned before, it is easy to detect manta rays (December to March and in July, August), and all year round white-tipped reef sharks, sea turtles, stingrays, Mobula rays, spotted eagle rays, moray eels, big schools of barracudas, grunts, colored tropical fish, etc….

Depending on weather conditions, you could also go to Cabo Velas, a diving site closer to Tamarindo, which is more sheltered from the wind and currents. This is a protected area, with similar marine flora and fauna. The maximum depth in this location is 18 meters.

A scuba diver with a turtle in the Catalina Islands.
Sea turtles are found at the Catalinas. Photo courtesy of Tamarindo Diving

TELL ME MORE

Diving from Tamarindo will be via boat diving. After approx. 45 minutes of navigation you will reach the first dive site. The captain will decide which is the most appropriate location according to the conditions of the day.

The dive trip is usually a two-dive trip, with refreshments offered during the surface interval. Sometimes it is easy to detect during the boat trip, whales, dolphins, sea turtles, and with a little bit of luck whale sharks.

The dive trip lasts approx. 5 hours leaving in the mornings. All equipment is provided and included in the price. This diving trip is for certified divers only. However, there are other trips for try-dives for non-certified people, and other scuba diving courses.

DO I NEED ADDITIONAL EQUIPMENT?

Divers are provided with all of the equipment. We have 3mm shorty and long wetsuits. Depending on the season, some people opt not to wear any wetsuit, or maybe just a rashguard due to the warmth of the water (May-August).

Use this wetsuit temperature guide to get you started.

The only thing you should bring, if you want to, is your diving computer, but it is not necessary as a professional divemaster with his own computer will always be with you.

A white tip shark in the Catalinas - Costa Rica
A white tip reef shark. Photo courtesy of Tamarindo Diving

WHAT LEVEL CERTIFICATION SHOULD I BE?

Divers of all levels can dive the Catalinas. Depending on their level, they will be followed by a divemaster or dive instructor. You can also take additional certifications and courses while diving in Costa Rica.

WHAT ARE THE CONDITIONS?

Conditions are mostly really good. The wind can sometimes affect the visibility and it can range from 6 meters to 20 meters.

The best season for diving is from November until March if you are keen to spot some manta rays. However, the diving here is always good with the exception of October due to the strong rains. 

The Catalina’s are not known for strong currents or drift diving.

A school of fish can be seen while diving in the Catalina Islands.
Schools of marine life can be found while diving in the Catalina Islands. Photo courtesy of Tamarindo Diving

HOW MUCH WILL I SPEND?

The diving trip for certified people (2 tank dives) costs 115 USD. 

There is a very convenient diving package of 10 dives (5 days) for 400 USD (days do not need to be consequent; you decide when you want to go diving).

For non-certified divers, we have two Discover Scuba Diving options: 1 day 159 USD and 2 days 169 USD. The Discover Scuba Diving depth limits are 12 meters.

The Open Water Diver course will cost 549 USD.

If people bring their own equipment, they can obtain a discount.

WHAT TYPE OF ACCOMMODATION IS AVAILABLE?

Tamarindo offers all kinds of accommodations. Generally, they are all good depending on the needs of each person. From fancy boutique hotels to hostels, or vacation rentals. There is enough for all pockets and tastes!

DESCRIBE YOUR PERSONAL EXPERIENCE

Diving at the Catalinas is usually an amazing experience, due to its incredibly rich submarine wildlife. During February and March, strong winds may affect visibility (6 meters) and water temperature can be around 20°C. When conditions are not optimal, we might opt to go diving at Cabo Velas, a more sheltered area, closer to Tamarindo Beach.

WHAT DO WE DO ON SURFACE INTERVALS?

Tamarindo town has got so much to offer. The beach is spectacular and it is well renowned as one of the best surfing spots in Costa Rica. There is also a different beach to visit every day. They are all amazing and the region of Guanacaste is the least rainy of the Country so you can enjoy sunny days during almost all year round (except October).

Tamarindo beach is set among 2 estuaries with mangrove forests that you can explore with a boat tour of the mangroves or renting a kayak and exploring them yourself. Just make sure you are always informed about the tides!

You can also rent an ATV and with a tour guide, go exploring the jungle woods around town. Many other boat trips are available. One of the most popular is the sunset tour on one of the several catamarans moored here or on board of a charming sailing boat.

Horse tours are also very popular and there is a canopy (zipline) for the more adventurous! As far as nightlife, you do not have to worry. There are many restaurants, bars, etc… for all tastes, budgets, and for a good night out in Costa Rica!

Going to Altitude after Diving may be a Problem because of Physics

Have you ever wondered if you can go for a wreck dive in the morning, then pack up your gear, get in your car and drive up the mountains to go snowboarding in the afternoon? There may not be many geographical locations where this is possible at all, however, for the sake of this question let’s take a deeper look at this scenario. Let’s explain why going to altitude after diving may be a problem because of what happens to divers during dives.

Going to altitude after diving may be a problem because…

The very short explanation is that we absorb ‘Nitrogen’ when we scuba dive. This means we need to slowly release it when we get back to sea level, the equivalent of 1 bar of pressure. If we go to altitude, the atmospheric pressure drops and we are at increased risk of decompression sickness due to the pressure change.

When we scuba dive, we breathe higher partial pressures of both Oxygen and Nitrogen. This physics principle in scuba diving is known as Boyle’s Law. Depending on the depth and a gas’s solubility, we absorb it over time until it would eventually reach equilibrium.

The longer and deeper we dive, the more gas our body soaks up. The more gas in our body, the longer it will take for that gas to leave our body. We need to ensure that we release this gas gradually. Rapid pressure release is what causes decompression sickness or the bends.

Scuba diving no-decompression limits are usually based on 1 bar of atmospheric pressure (sea level, therefore ocean diving). Going to altitude after diving decreases atmospheric pressure and we could potentially get decompression sickness.

There is a more rapid pressure drop at lower altitudes, exemplifying this problem. Altitude divers specifically learn how to deal with the decreased atmospheric pressure when conducting dives in lakes at altitude.

What about the other way around?

Ok, sure. What about a few runs on the piste in the morning and a deep dive in the afternoon? While this solution may sound like a winner, there are still issues with this. In order to dive conservatively, we should be acclimatised to the atmospheric pressure at the surface of the body of water that we intend to dive in.

This is why altitude divers learn to wait a minimum of 6 hours upon reaching their destined dive location in the mountains, before going on the dive.

PADI, SSI & RAID offer altitude diving courses.

Marcel Korkus currently holds the Guinness World Record for the highest altitude scuba dive in the world.

So there you have it. Going to altitude after diving may be a problem because you will most likely still have residual nitrogen in your system and are therefore at increased risk of decompression sickness.

What is Scuba Diving – All You Need To Know

You’ve probably heard of the term ‘SCUBA’ and wondered, what is scuba diving? Is it similar to snorkeling? No. Do you need special equipment or training for scuba diving? Well, yes, you do! And you have come to the right place to find out everything and anything scuba related.

What is Scuba Diving?

Scuba diving is a way to remain underwater, breathing from an independent air source, known as a ‘Self-Contained Underwater Breathing Apparatus.’

Read more about SCUBA acronyms and what they stand for.

Scuba divers carry their SCUBA with them and breathe from the compressed air in their tank. This allows them greater freedom underwater compared to ‘surface-supplied’ divers who use an umbilical cord connected to the surface.

Scuba diving also differs to freediving, an activity where the diver holds their breath underwater. This means scuba divers are able to remain underwater for longer due to their SCUBA equipment.

When was Scuba invented?

In 1942, Jacques-Yves Cousteau and Émile Gagnan invented and tested the first successful and safe open-circuit scuba, known as the Aqua-Lung. Their system combined an improved and safer on-demand regulator with high-pressure tanks filled with air. However, in 1952, Major Christian J. Lambertsen patented a modification of his original invention from 1939 (an underwater free-swimming oxygen rebreather apparatus) and coined the term, ‘SCUBA.’

What Equipment is used for Scuba Diving?

SCUBA was once used to refer to the actual breathing apparatus that enabled divers to breathe underwater. However, the term is now used to describe the whole general equipment setup for a scuba diver. This includes:

  • Mask
  • BCD
  • Primary regulator and alternate air source
  • SPG to check air
  • Tank/cylinder
  • Fins
  • Weights
  • Exposure protection; wetsuit, drysuit, or rash guard
  • Snorkel
  • Dive computer
  • Compass

What Gas is in Scuba Tanks?

Scuba tanks on a boat. What gas is in scuba tanks?
What gas is in scuba tanks? It is a roughly a mix of 21% Oxygen, and 79% Nitrogen.

Some new divers refer to scuba tanks as ‘oxygen tanks’ but this is incorrect. Breathing pure oxygen while diving underwater will be toxic and very dangerous. Scuba tanks actually consist of ‘Air.’ This mix is very similar to the normal air that we breathe on land. According to NASA, this consists of:

    Major      : 78.08% Nitrogen (N2), 20.95% Oxygen (O2), 
    Minor (ppm): Argon (Ar) - 9340; Carbon Dioxide (CO2) -  410
                 Neon (Ne) - 18.18; Helium (He) - 5.24; CH4 - 1.7
                 Krypton (Kr) - 1.14; Hydrogen (H2) - 0.55

When we fill scuba tanks, the gas is usually 21% Oxygen, 78% Nitrogen, with the remainder being other gases.

You can get other mixes of gases in scuba tanks, such as Enriched Air, or various blends that is used in ‘technical diving.’

What is Scuba used for?

Scuba diving is mostly known as a leisure activity that allows divers to explore the underwater world. It gives you extended time underwater, and the freedom to swim around as your scuba equipment is attached to you.

However, scuba can also be used for commercial, scientific, military, and sport purposes. The appeal of the equipment allows scuba diving to have many uses.

Read our interviews with scuba divers and the various jobs they have in different industries.

Training for Scuba Diving

You will need some training to go scuba diving. This should be with a scuba diving professional. They will teach you the basics of scuba diving. This will cover how to use the scuba equipment and safety rules for scuba diving.

You do not need to be certified to go scuba diving. You can sign up for a scuba diving experience under the supervision of the dive professional. However, if you do enjoy it, you should get certified with a diving agency, such as PADI, SSI, RAID, or others, as this will allow you to dive around the world.

Do I need to be certified to go scuba diving?

What are some of the risks of scuba diving?